“HelloWorld The Hard Way”
Written on October 28th, 2019 by |3ASS3XE
INTRO: I’m way too anti-social for a proper introduction, nor do I possess the ego to attempt one. So, we are just going to jump into this very cool Hello World program the not so easy way
Assembly programming language is the last abstraction from high-level programming to full-on machine code. Within the realm of reverse engineering being familiar with low-level programming is a must in the absence of source code documentation.
Step 1 Create a HelloWorld.asm text file.
Create a HelloWorld.asm text file using any text editor of preference
Writing in nasm, in my opinion, is similar to C programming layout, where directives and libraries are called at compilation, the code is executed in the main block, and functions are referenced and called outside that main block of code.
Step 2. global _start
Our first task within our Hello World program is establishing the global _start directive. The global directive declares _start as a reference point for where our main execution of code. In turn, you can label this area anything other than _start(i.e. _main)
global_start
_start: ...some code ...
Step 3. Adding .text |_start | .data
Branching from the introductory global directive, we move into .text and .data. The .text is where our set of instructions will reside, and .data will harbor our string to be inserted as the output on the command line.
global _start
section  .text
_start:

section .data
Step 4. Getting technical with …data
Now that we have our nasm framework somewhat established, we are ready to construct our program! Our first task is to inject our message within the data section of our program. As our program steps through it’s instructions we will point to our desired string as expected output. This is demonstrated in the following code syntax of the edited .data section.
section .data
message:db "Hello World!",0x0A; string & newline hex
mlen equ $-message
The above syntax may be a little hard to interpret at first glance, but is extremely simple upon explanation! Within nasm labels can be defined to hold strings, and later referenced through assembly instruction. The above format can be described as
“label: instruction ‘string’” Our defined label is dubbed message and db (defined byte) defines message with the Hello World string. The trailing syntax references mlen which is equated to the size of the defined label. We do this so that our program knows the character length of our message label. Later on, we will reference message: and mlen in memory which will load our Hello World string into the stack for output.
Step 5. Talking the kernel’s language…Registers+0x80.
General Purpose Registers
- EAX(Accumulator)
- ECX(Counter)
- EDX(Data)
- EBX (Buffer)
In a later post, I will dive deep into what are registers; why as a developer they are important, and how we can manipulate them to generate smaller code : ). For now, we will for the sack of brevity focus on the main actors within our program. The above four registers are called General Purpose Registers and are essentially variables that will hold our desired values, with our .text space.
_start: mov eax, 0x4
Within IA-32 Architecture, the number 4 is the system call to write to the screen. Referencing the IA-32 Manual write is defined as:
“ssize_t write (int fd, const void *buf, size_t count) “. To fill these parameters with the requested information we will use the remaining three General Purpose Registers with the included values.
mov ebx, 0x1;
mov ecx, message;
mov edx, mlen;
int 0x80;
Our first argument for the write call is fd (file descriptor) which we provide with the value 1 for STDOUT(STDIN=1, STDOUT=1,STDER). Our second argument will point to our message label in our data section which contains our string, and our third argument will point to the size of our string in the data section, which should be 13(‘H’‘E’‘L’‘L’‘O’’ ‘‘W’O’‘R’‘L’‘D’’!’‘\0’). To finish the preceding instructions we use system call int 0x80 to signal to the kernel to execute the preceding instructions.
Step 6 Wrapping up …SYSCALL: exit(0)
mov eax 0x1
mov ebx 0x0
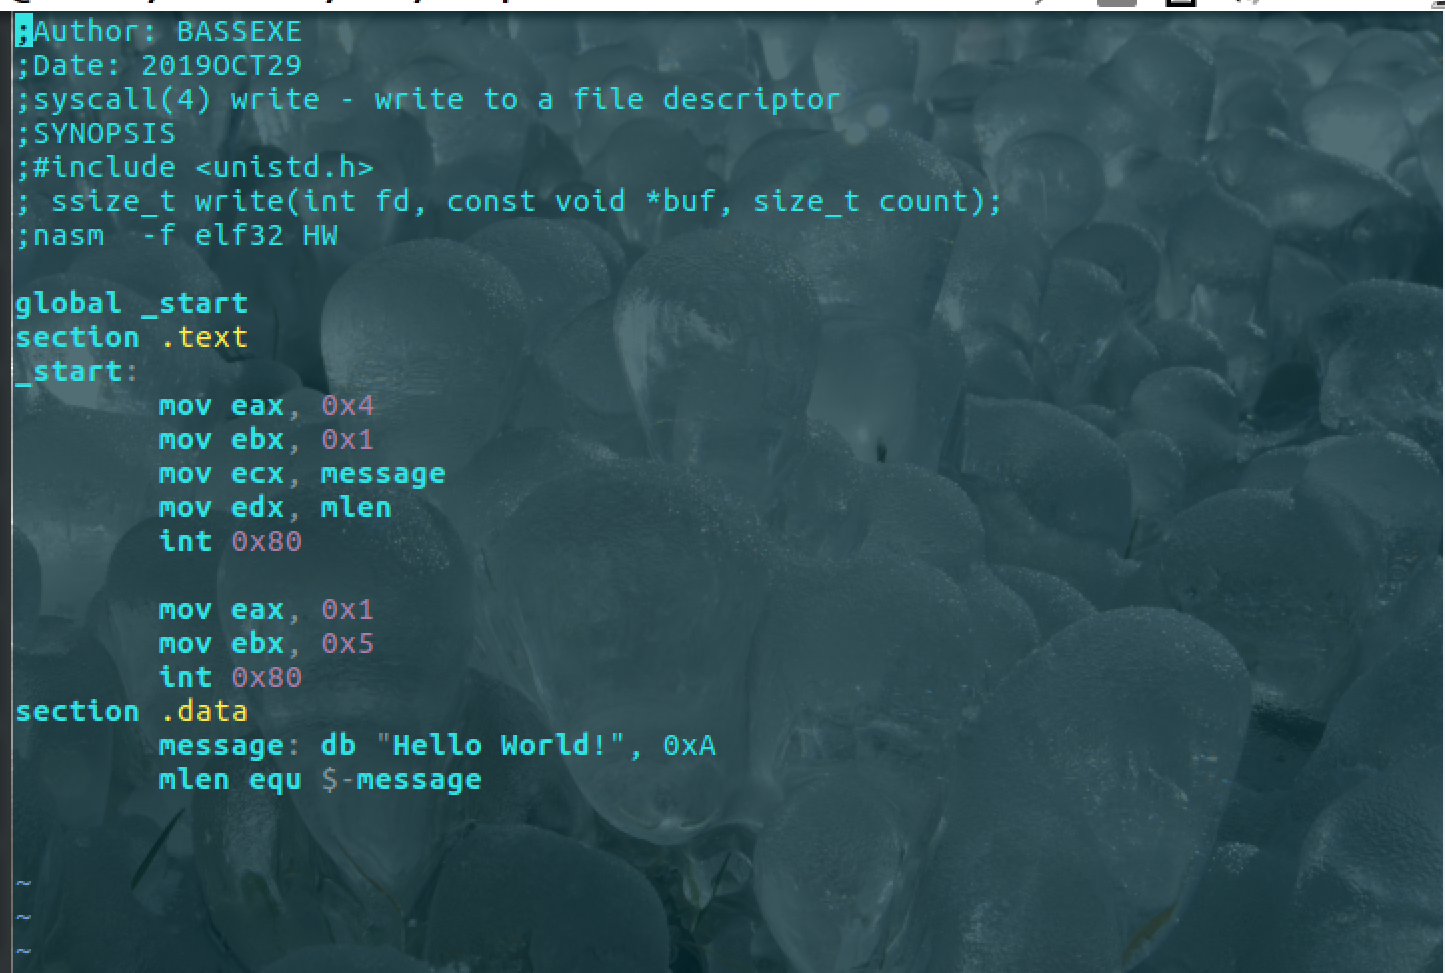
int 0x80Wrapping up our program we now leverage the system call 0x1(_exit) which tells the CPU we would like to exit our Hello World program. Loading the value of 1 into eax, our trailing ebx register will be given the value of 0, since the only value we want to be returned is 0 for a success message. Now that we are done with our instruction to exit, we call int 0x80 again to wrap up our assembly program. Below is our full HelloWorld program in all it’s unappreciated glory.
global _start; tells our linker where our instructions start.
section  .text ; Our designated text area for assembly instructions
_start:
mov eax, 0x4 ; SYSCALLZ: _write
mov ebx, 0x1 ; Value 1 for STDOUT
mov ecx, message ; move address of message label into ecx
mov edx, mlen  ;moves the length of our label in bytes to edx
int 0x80     ; execute the preceding instructions.

mov eax 0x1
mov ebx 0x0
int 0x80

section .data; Our Designated data section
message: db "Hello World!", 0x0a; Our string with a newline character.
mlen equ $-message; The length of our string message
Step 7, Assemble and link.
ech_0x80$:nasm -f elf HelloWorld.asm
ech_0x80$: ld -o HelloWorld.o HelloWorld
ech_0x80$: ./HelloWorld
Hello World!
After saving your HelloWorld.asm file, executing the above commands within the Linux terminal should generate our “Hello World!” string on the screen. Our assembler nasm is used to create an object file named HelloWorld.o, and from there we link the object file into an executable.
Conclusion
Compared to scripting languages like python, assembly programming is daunting and requires more research than just using a printf function. That said there may come a time where all you possess is a binary and a debugger, and called to piece something back together. Having some familiarity within the inner working of system calls and data manipulation in Assembly goes very far in our software-driven world.